The idea of Converting Space into Acrylic Tennis Court has gained popularity, especially given the smooth, consistent bounce acrylic surfaces offer. Renowned professional arenas, like those at the Grand Slams, take pride in this top-quality court material, and now, so can you! With expert guidance from Pacecourt, delve into this comprehensive guide to turning an existing space into your very own acrylic tennis court. Whether refurbishing an old tennis court or repurposing a different space, this guide is here to assist you.
1. Assessing Your Space:
Before diving into the construction, evaluate your area’s size and suitability. Pacecourt advises that for a full-sized court, you’ll need at least 120 feet by 60 feet, including the run-off area. If space is a constraint, don’t fret! With Pacecourt’s innovative solutions, you can still create a mini-tennis court or an efficient practice wall area.
2. Ground Preparation:
To lay the perfect acrylic surface, begin with:
- Clearing: Pacecourt emphasizes the removal of all existing structures, vegetation, and debris. A clean slate is crucial!
- Levelling: A flat ground ensures a consistent ball bounce. This could mean grading the land or incorporating compacted fill material.
- Drainage: To prevent any water damage or pooling, integrate adequate drainage systems. Pacecourt recommends French drains or a slight slope for optimal water runoff.
3. Base Construction:
Pacecourt highlights three primary bases for tennis court construction:
- Asphalt: Renowned for its resilience and long lifespan.
- Concrete: Guarantees a steady bounce with minimal upkeep.
- Post-tensioned concrete: The inclusion of cables within the concrete makes it resistant to cracks, making it ideal for regions with shifting soils.
Your choice of base will be instrumental in dictating your court’s playability, subsequent maintenance, and overall costs.
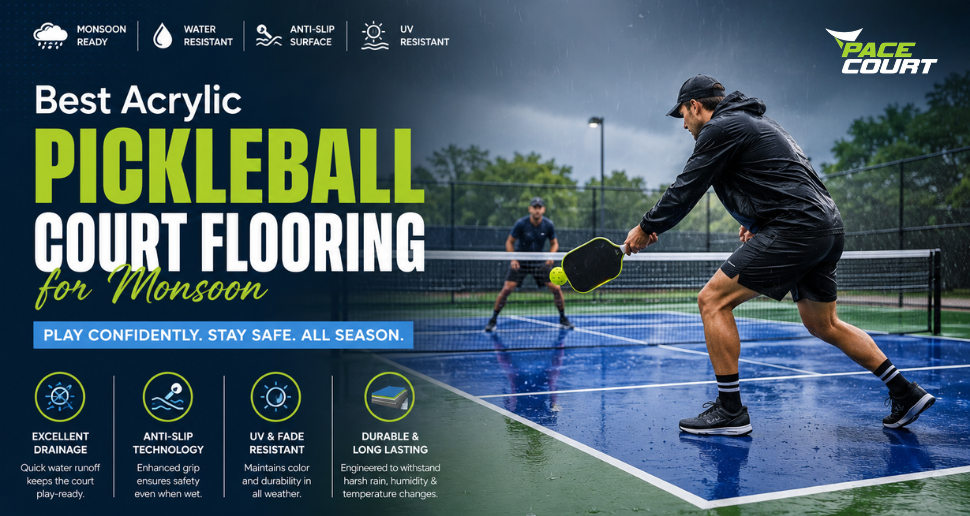
4. Acrylic Surface Installation:
With the base set, you’re ready for the acrylic:
- Primer: Pacecourt suggests a primer coat to reinforce the bond between the base and the acrylic.
- Acrylic Resurfacer: This acts as a filler, smoothing out imperfections.
- Colour Coats: Usually, two of these are needed, defining the court’s appearance, texture, and influencing play dynamics.
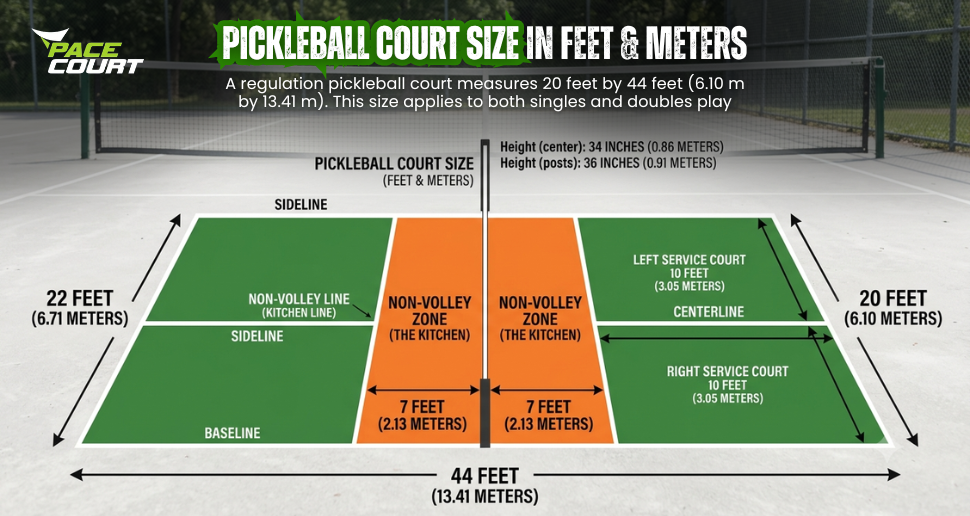
- Line Painting: Once dry, ensure you paint the lines according to USTA-approved measurements.
5. Additional Components:
Pacecourt believes in the finer details that enhance your tennis experience:
- Fencing: Essential for ball containment and player safety.
- Lighting: For those passionate evening rallies.
- Net and Posts: The heart of the tennis game!
- Benches or Seating: Comfort for players and spectators alike.
- Windscreen: A lifesaver in windy conditions, reducing disruptions.
6. Maintenance:
Acrylic courts, though relatively low-maintenance, demand regular care to uphold their prime condition. Pacecourt recommends:
- Regular Cleaning: Sweep off debris, leaves, and dirt to maintain that pristine surface.
- Resurfacing: Depending on use, consider resurfacing every 5-8 years.
- Regular Inspection: Be vigilant about cracks, mold, or any wear signs. Addressing them promptly ensures longevity.
In Conclusion:
Converting an existing space into an acrylic tennis court, with Pacecourt’s expertise, is a journey worth taking. It promises a blend of professional-quality play and the warmth of home. By ensuring meticulous installation and consistent maintenance, tennis enthusiasts, be it casual players or ambitious professionals, can relish countless hours on a surface that’s both durable and performance-oriented. Your dream court awaits!
Upgrade Your Sports Court Today
Get premium synthetic acrylic flooring designed for durability, grip, and performance.
Get Free Consultation